


Anyone who’s ever had a blister while hiking knows how quickly it can derail a trip. The pain can make walking uncomfortable, and once a blister forms, it can be hard to heal on the go. That’s why blister prevention is key, and in my experience, Leukotape is one of the best tools for the job. Here’s a look at why it’s so effective and how to use it to keep your feet in top shape during long hikes or backpacking trips.
What Is Leukotape?
Leukotape is a sports therapy tape originally designed to help athletes with muscle injuries. It’s the brown, sometimes colored, tape you might see marathon runners and other athletes using. It combines a super-adhesive zinc oxide formula with a durable rayon fabric, creating a tape that sticks well and holds up under tough conditions.
Though it was made for injury treatment, Leukotape has found an even better use as a blister prevention aid. It provides a protective barrier that prevents friction from turning into painful blisters on your feet.
How Leukotape Prevents Blisters
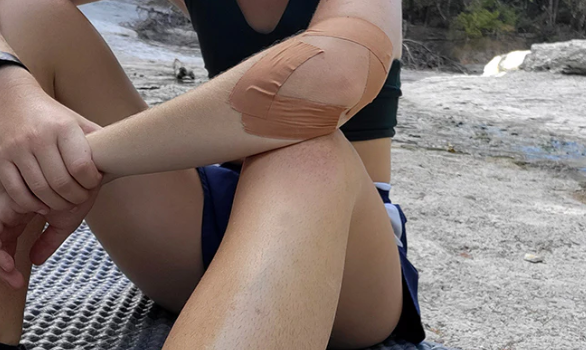
Leukotape works by preventing friction before a blister can form. The key is to apply the tape at the first sign of a “hot spot”—an area on your foot that feels irritated or is beginning to rub. The tape forms a protective layer over the area, allowing you to keep hiking without the skin breaking down into a blister.
You can also apply Leukotape to areas that are prone to blisters. I often use it on known problem spots before setting out, especially if I expect long, wet days on the trail. Applying it in the morning can save you from discomfort later on.
Why Leukotape Is So Effective
Leukotape stands out for several reasons:
- Strong Adhesion: The tape sticks incredibly well to your skin, even in wet or hot conditions. It’s much more reliable than other types of tape or moleskin.
- Breathable: Unlike duct tape, which traps moisture, Leukotape is made from breathable fabric that allows your skin to stay dry and avoid additional irritation.
- Easy to Tear: You won’t need scissors to cut it. Leukotape tears easily, and while I find it easier to tear crosswise, you can use your hands to cut it in any direction.
- Gentle on Skin: It’s skin-friendly, so when it’s time to remove it, it won’t hurt, and it won’t leave behind sticky residue.
- Affordable: At under $10 for 15 yards, Leukotape is an inexpensive investment for long-term blister prevention.
Choosing the Right Leukotape
Leukotape comes in two versions: Leukotape P and Leukotape K.
- Leukotape P: This is the original version, and the one I recommend for blister prevention. It has minimal stretch and sticks well to your skin, especially in wet or warm conditions. It’s the best choice for feet.
- Leukotape K: This version is stretchier, making it more suitable for areas that need some flexibility, like joints. It’s good for preventing blisters on your hips or shoulders, but not as effective on your feet. It’s also a bit wider, which can make it trickier to apply to smaller areas.
For most hiking and backpacking purposes, Leukotape P is the way to go.
How to Apply Leukotape
To get the best results, make sure your feet are clean and dry before applying Leukotape. Dirt or moisture will affect the tape’s ability to stick, and it might lead to even worse blisters.
Once your feet are clean, apply the tape directly over any hot spots, making sure it’s as smooth as possible. Creases or folds can catch on your socks and reduce the effectiveness of the tape. If the spot is a little awkward, you may need to cut the tape into smaller pieces to patch it properly.
Avoid wrapping the tape all the way around your foot, as this could constrict blood flow. Leukotape doesn’t stretch, so wrapping it tightly could cause circulation issues. You want the tape to stay secure, but not too tight.
I’ve found that Leukotape stays on well without the need for additional products like benzoin tincture to help with adhesion. It stays put even after creek crossings, sweat, and a long day of hiking.
How to Store Leukotape on the Trail
Carrying Leukotape in the field is easy, but you need a good storage method since you won’t want to lug around the entire roll. Here are two methods I’ve found work well:
- Release Paper: This is the paper backing that comes with mailing labels. Cut pieces of Leukotape and stick them to the release paper, then roll them up for easy storage. It keeps the tape sticky and ready to use, but it can get a little bulky.
- Plastic Straw or Pen: For a more compact option, wrap the tape around a plastic straw or a piece of pen. This method saves space but may make it harder to gauge how much tape you have left. It’s a great option if you’re trying to save weight and space.
Other Uses for Leukotape
Leukotape isn’t just for blisters—it can serve several other purposes in the field:
- Sports Therapy: It can be used as originally intended, to help stabilize muscles and joints in case of injury.
- Improvised Bandages: It sticks better than standard band-aids, so you can use it to patch up small cuts or blisters in a pinch.
- Gear Repair: While not as heavy-duty as duct tape, it can be used for emergency gear repairs when needed.
Final Thoughts
Leukotape is a game-changer for blister prevention. It’s lightweight, effective, and incredibly sticky, making it the perfect solution for those annoying hot spots that can ruin a hike. Pair it with the right socks and footwear, and you’ve got a great system for keeping your feet blister-free on the trail. If you’ve never tried it, I highly recommend giving it a shot—you won’t regret it.