


As an outdoor enthusiast, your gear collection tends to grow over time. From hiking essentials to more niche equipment, everything finds its place—though often in cluttered piles or scattered storage. If you’re like me, you’ve probably found your gear everywhere: stacked in the corner of your room, piled in bins, or shoved into random spaces in the garage. After years of living with disorganization, I decided it was time to make a change. Enter the “gear wall.”
Building a gear wall has been a game-changer in terms of organizing my collection. Even with limited space—just a wall in my bedroom and a little room in the garage—I’ve managed to create a functional and aesthetically pleasing storage solution that not only keeps my gear in place but also makes it easy to grab what I need.
Step 1: Getting Started
The first step in creating your dream gear wall is figuring out the space you have. For me, it was a bit of trial and error, but with a little help from my mom (who has a keen eye for design), I identified a small section of my bedroom wall that would work perfectly.
Next, you’ll want to set a budget. I opted for a minimal labor solution, choosing something that didn’t require much construction work. If you want to skip the hard labor like I did, a great option is to invest in ready-made systems like ELFA Closet Solutions from The Container Store. They offer everything from shelves to hooks that can help you create a neat, efficient setup.
Before diving into buying and assembling, it’s important to evaluate your gear. Sorting everything into categories (sleeping gear, electronics, cooking equipment, etc.) will give you a better understanding of how much space you’ll need for each type of gear.
Step 2: Plan Your Wall Layout
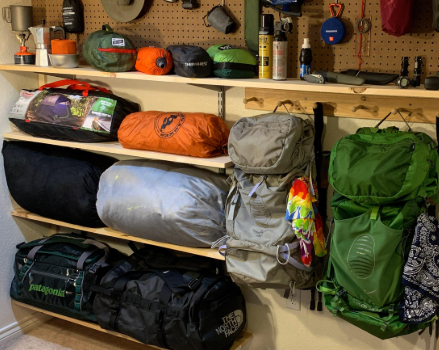
When I started looking at organizing options, I quickly realized that the best solution for me was to divide the space into two 2-foot sections. This size worked well with the modular options from ELFA, such as hanging bars, drawers, and shelves. As I began assembling the wall, it became clear that this project would take some trial and error. I made multiple orders to get it right—sometimes the original plan didn’t work out, and other times, I found even better solutions as I went along.
Aesthetics were important to me as well. My bedroom is my sanctuary, so the gear wall had to be both functional and visually pleasing. I wanted it to be a stylish display of all my gear that could double as art—let’s face it, a Pinterest-worthy wall was my goal.
Step 3: Organizing Your Gear
With the wall space and components selected, it was time to get creative with how to organize my gear.
Backpacks: I have an absurd number of backpacks—running packs, day packs, fanny packs, travel packs, and backpacking packs. Initially, I thought about using a pegboard for hanging them, but the price was steep, and it didn’t seem the best use of space. Instead, I installed two hanging bars and used kitchen S-hooks to hang the backpacks. This allowed me to hang multiple packs on each rod (and my climbing helmet too), which saved space while keeping them organized and visible.
Sleeping Bags & Quilts: Proper storage for sleeping bags is important, as compressing them for too long can damage the insulation. I wanted to store them with plenty of space to maintain their loft, so I placed them on the top shelf. This setup works great for my two sleeping bags, and if I add another in the future, I’ll still have space.
Trekking Poles & Umbrella: Trekking poles are tricky because they’re long and thin, and don’t fit well in regular storage bins. After searching for the right solution, I found shelf bracket hooks from The Container Store. These work perfectly for hanging my trekking poles and umbrella on the side of the wall, keeping them out of the way but still easily accessible.
Electronics: Since I use rechargeable electronics for both outdoor adventures and daily life, I needed a designated spot for charging gear like my headlamp and battery bricks. I added a small shelf for a multi-USB charging station, which also doubles as a space for maps and books, offering a convenient “landing zone” for all my pre-trip prep.
Guidebooks & Maps: This was a last-minute addition to my gear wall. I realized that in order to make the wall work, I had to clear out some of my storage cubbies that were filled with old textbooks and childhood books. I integrated a bookshelf into my gear wall, thanks to the ELFA system, and now my outdoor guidebooks and NatGeo maps have their own place. The maps fit perfectly into tall boxes that clip into the pegboard system, keeping them organized and easy to access.
Step 4: Fine-Tuning and Maintenance
Once everything was in place, I spent some time fine-tuning the organization. I continually adjust as my gear collection evolves or as I realize more efficient ways to organize everything. The key to maintaining your gear wall is being proactive about keeping it neat—especially if you tend to add new gear frequently.
One of the benefits of a gear wall is that everything is visible, so I’m no longer digging through bins to find what I need. It also gives me the freedom to easily swap out gear when I head out on different adventures, and the wall itself becomes an inspiring part of my bedroom decor.
Conclusion
Building a gear wall might seem like a big task, but once you start, it’s incredibly rewarding. Not only does it help keep your gear organized, but it also allows you to showcase the pieces you love. It’s a functional storage solution that adds a touch of creativity to your space. If you have a small area available, take the plunge and build your own gear wall—you won’t regret it!